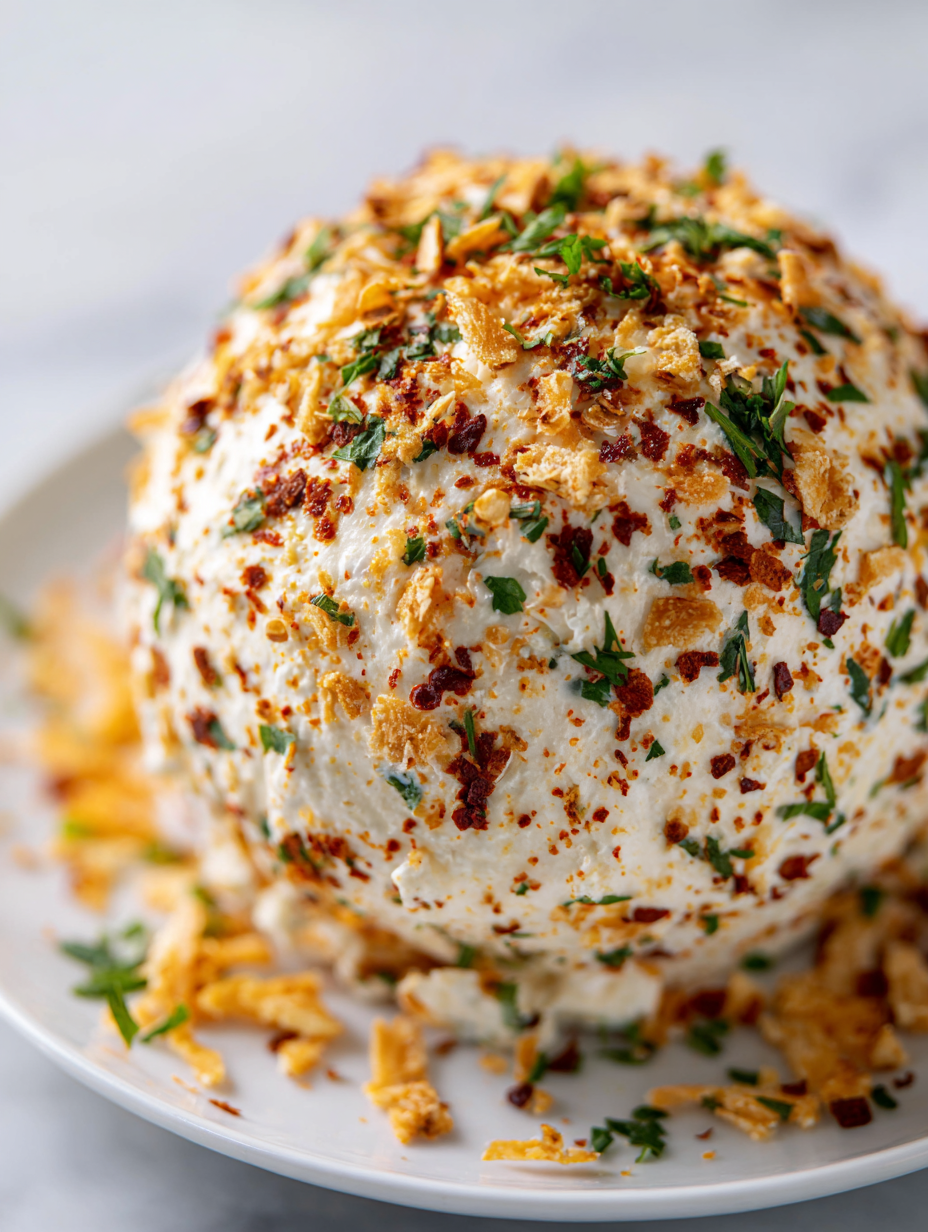
This cheese ball recipe is inspired by my grandmother’s secret ingredient: a dash of smoked paprika that adds a subtle smoky depth, transforming a simple appetizer into a nostalgic, crowd-pleasing staple. I love how the smoky aroma hits your nose just as you unwrap it from the foil, reminding me of lazy family gatherings and summer picnics in her backyard.
Making this cheese ball feels like a small act of tradition—something I can pass down or tweak with my own twists. It’s one of those dishes that tastes better the longer it sits, developing more flavor and a richer, creamier texture. Plus, it’s honestly the easiest thing to assemble when you want something impressive without fuss.
This cheese ball recipe is inspired by my grandmother’s secret ingredient: a dash of smoked paprika that adds a subtle smoky depth, transforming a simple appetizer into a nostalgic, crowd-pleasing staple. I love how the smoky aroma hits your nose just as you unwrap it from the foil, reminding me of lazy family gatherings and summer picnics in her backyard.
A Nostalgic Twist on Classic
- This cheese ball reminds me of my childhood family gatherings, where my mom’s version was always the first to disappear.
- I love how a simple mix of cream cheese and sharp cheddar can turn into something so addictive and comforting.
- There’s a chaotic joy in rolling this in nuts, especially when everyone’s hands get sticky and laughter erupts.
- Seeing guests gather around, eagerly digging in, makes all the effort worth it, even if I’ve fudged a step or two.
- It’s a humble dish that somehow feels fancy enough for holidays but easy enough for a weeknight snack.
The story behind this recipe
- This cheese ball recipe came from a late-night kitchen experiment. I was craving something creamy, tangy, and a little crunchy—something that would bring a crowd together without much fuss. The first time I made it, I was surprised how a handful of simple ingredients could turn into a party centerpiece that vanished in minutes.
- I’ve always loved the tactile joy of rolling cheese mixtures in nuts or herbs, feeling the sticky, cheesy warmth under my fingertips. It’s an honest, imperfect process, but that makes it feel more personal. Over the years, tweaking it with different cheeses and spices has turned it into a little tradition of my own, especially when I want to impress without stressing.
- heading
- story_type
Cheese Ball Trivia & Origins
- Cheese balls gained popularity in American party culture during the 1950s, often served at potlucks and family gatherings.
- The earliest versions used simple cream cheese mixed with herbs and nuts, evolving over decades into the versatile appetizer we enjoy today.
- In some regions, cheese balls are called ‘cheese logs’ or ‘cheese rounds,’ reflecting their traditional shapes before rolling in coatings.
- The concept of rolling cheese in nuts or herbs dates back centuries, aiming to add texture and flavor while masking less fresh cheese.
- Modern variations include gluten-free, vegan, and spicy versions, showcasing how this humble dish adapts to contemporary tastes.
Key Ingredients Breakdown
- Cream cheese: I love how its velvety texture binds everything together, making the ball rich and smooth—swap with neufchâtel for a lighter touch.
- Sharp cheddar: Its bold flavor really stands out; if you want milder, try mild cheddar or even a sprinkle of Parmesan for saltiness.
- Smoked paprika: Adds that subtle smoky aroma I adore, but if you don’t have it, a dash of chipotle powder gives a similar depth.
- Nuts (pecans or walnuts): I prefer toasted nuts for crunch and warmth—skip if nut allergies are a concern, or use crispy chickpeas for crunch.
- Herbs (chives or parsley): Fresh herbs brighten the whole thing; dried can work in a pinch but lack that vivid punch.
- Optional add-ins (bacon bits, hot sauce): I stir in bacon for smoky richness or hot sauce for a spicy kick—use sparingly to avoid overpowering.
- Coating (crushed nuts, herbs, or paprika): Rolling in toasted nuts gives a warm, toasty fragrance; herbs add freshness, paprika adds color and a smoky scent.
Spotlight on key ingredients
Cream cheese:
- I love how its velvety texture binds everything together, making the ball rich and smooth—swap with neufchâtel for a lighter touch.
- Sharp cheddar: Its bold flavor really stands out; if you want milder, try mild cheddar or even a sprinkle of Parmesan for saltiness.
- Smoked paprika: Adds that subtle smoky aroma I adore, but if you don’t have it, a dash of chipotle powder gives a similar depth.
Nuts and herbs:
- Nuts (pecans or walnuts): I prefer toasted nuts for crunch and warmth—skip if nut allergies are a concern, or use crispy chickpeas for crunch.
- Herbs (chives or parsley): Fresh herbs brighten the whole thing; dried can work in a pinch but lack that vivid punch.
Notes for ingredient swaps
- Dairy-Free: Swap cream cheese for coconut cream cheese or cashew cheese spread. It’s less tangy, with a milder, nutty flavor.
- Vegan: Use plant-based shredded cheese and a vegan cream cheese alternative. The texture stays creamy, but flavor can be slightly different.
- Cheddar: Try Monterey Jack or Colby for a milder, buttery taste. For a sharper bite, Gruyère works well.
- Nuts: Almonds or cashews can replace pecans or walnuts. Toast them first for a warm, toasty aroma, or skip for allergy concerns.
- Herbs: Basil, tarragon, or dill add freshness. Dried herbs are okay but lack the vibrant punch of fresh.
- Spices: Smoked paprika can be swapped with chipotle powder for a smoky heat, or omit for a milder flavor.
- Coatings: Crushed pretzels or crispy chickpeas offer crunch, or go for paprika, chili powder, or everything bagel seasoning for extra flavor.
Equipment & Tools
- Mixing bowl: Combine and mix cheese ingredients smoothly.
- Spatula or spoon: Stir ingredients and taste for seasoning.
- Plastic wrap: Shape and chill the cheese ball without sticking.
- Skillet: Toast nuts and herbs for enhanced aroma and flavor.
- Serving platter: Display and serve the finished cheese ball.
Step-by-step guide to cheese ball
- Gather all ingredients and equipment. Set out cream cheese, shredded cheese, spices, nuts, herbs, and your chosen coating. Preheat your oven to 180°C (350°F) if roasting nuts or toasting herbs beforehand.
- In a large mixing bowl, combine softened cream cheese and shredded cheese. Mix until smooth and creamy, about 2 minutes with a spatula or spoon. If the mixture feels too stiff, microwave for 10 seconds to loosen.
- Add smoked paprika, chopped herbs, and any optional add-ins like bacon or hot sauce. Mix thoroughly, tasting and adjusting spices as needed. The mixture should be flavorful but balanced.
- Scoop the cheese mixture onto a sheet of plastic wrap. Use your hands to shape into a tight ball, about 10 cm (4 inches) across. Wrap tightly and chill for at least 30 minutes, or up to 2 hours for best flavor.
- While the cheese ball chills, prepare your coating: toast nuts in a dry skillet until fragrant, about 3 minutes. Let cool. If using herbs or spices, combine in a shallow dish.
- Unwrap the chilled cheese ball. Roll it in the toasted nuts, pressing gently to adhere evenly. For a different look, roll in chopped herbs or paprika for color and aroma.
- Place the coated cheese ball on a serving platter. Rest for 10 minutes to allow flavors to settle. Garnish with additional herbs or nuts if desired.
- Serve with crackers, sliced baguette, or crisp vegetables. Keep at room temperature for up to an hour before serving for optimal creaminess.
Chill the wrapped cheese ball for at least 30 minutes, then unwrap and roll in your chosen coating. Rest for 10 minutes before serving to let flavors meld. Present on a platter, garnished with extra herbs if desired.
How to Know It’s Done
- Color: Nuts and herbs are evenly coated with a toasted, golden hue.
- Texture: The cheese ball feels firm but slightly yielding when gently pressed.
- Appearance: It maintains a smooth, round shape without cracks or flattening.
Smoked Paprika Cheese Ball
Ingredients
Equipment
Method
- In a large mixing bowl, combine the softened cream cheese and shredded cheddar. Mix with a spatula or spoon until smooth and creamy, about 2 minutes, until the mixture feels soft and well blended.
- Add the smoked paprika, chopped herbs, and any optional add-ins like bacon bits or hot sauce. Mix thoroughly, tasting and adjusting the spices to your liking. The mixture should be flavorful and evenly seasoned.
- Scoop the cheese mixture onto a sheet of plastic wrap. Use your hands to shape it into a tight, smooth ball about 10 cm (4 inches) across. Wrap it tightly and refrigerate for at least 30 minutes to firm up.
- While the cheese ball chills, toast the nuts in a dry skillet over medium heat until fragrant and golden, about 3 minutes. Let them cool completely before using.
- Unwrap the chilled cheese ball and place it on a serving platter. Pour the toasted nuts onto a shallow dish.
- Gently roll the cheese ball in the toasted nuts, pressing slightly to help the nuts adhere evenly all around. You can also roll it in chopped herbs or paprika for extra color and aroma.
- Place the coated cheese ball back on the platter and let it rest for 10 minutes. This helps the flavors meld and keeps the coating in place.
- Serve the cheese ball with crackers, sliced baguette, or fresh vegetables. For best flavor, allow it to come to room temperature for about 15 minutes before serving.
Pro tips for perfect cheese balls
- Bolded mini-head: Use room temperature cream cheese for easier mixing and a smoother cheese ball.
- Bolded mini-head: Toast nuts until fragrant and golden to enhance their crunch and aroma.
- Bolded mini-head: Mix in spices and herbs gradually, tasting as you go to balance flavors perfectly.
- Bolded mini-head: Chill the wrapped cheese ball for at least 30 minutes to help it hold its shape and develop flavor.
- Bolded mini-head: When rolling in coatings, press gently to ensure an even layer that sticks well.
- Bolded mini-head: Serve at room temperature to maximize creaminess and flavor release.
- Bolded mini-head: If the mixture feels too sticky, refrigerate for 10-15 minutes before shaping.
Common cheese ball mistakes and how to fix them
- FORGOT to preheat the oven → Ensure oven is fully preheated before baking.
- DUMPED too much spice → Add spices gradually and taste as you go.
- OVER-TORCHED nuts → Toast nuts on medium heat, watch closely to prevent burning.
- MISSED chilling time → Chill cheese ball at least 30 minutes for better shape and flavor.
Quick Fixes and Pantry Swaps
- If mixture feels too sticky → Dampen hands with cold water before shaping.
- When cheese ball cracks → Chill longer, or gently press cracks closed with a spoon.
- Splash a little lemon juice if cheese mixture tastes flat or dull.
- Patch over burnt nuts with fresh toasted ones for better aroma.
- Shield cheese ball with plastic wrap when not serving to prevent drying out.
Prep, store, and reheat tips
- Prepare the cheese mixture and shape into a ball up to 24 hours ahead; store wrapped in plastic in the fridge. Sensory note: It firms up slightly but retains creamy qualities.
- Toast nuts and chop herbs in advance; keep separately in airtight containers. Nuts stay crunchy for up to 3 days, herbs lose some vibrancy after 24 hours.
- The flavor deepens overnight as spices and herbs meld; best eaten within 2 days for optimal freshness and aroma.
- Refrigerate the fully coated cheese ball for up to 3 days. Let sit at room temperature for 15-20 minutes before serving to restore creaminess and aroma.
Top questions about cheese balls
1. What exactly is a cheese ball?
A cheese ball is a creamy, savory appetizer made from a mixture of cheeses, often rolled in nuts or herbs, served chilled or at room temperature.
2. How flexible is this cheese ball recipe?
You can customize it with different cheeses, spices, and coatings like nuts, herbs, or spices for varied flavors.
3. Can I prepare a cheese ball in advance?
Yes, you can make it ahead; just wrap it tightly and refrigerate for up to 24 hours before serving.
4. How long should I chill the cheese ball?
Chill the shaped cheese ball for at least 30 minutes to firm it up, making it easier to roll in coatings.
5. Should the cream cheese be cold or softened?
Use softened cream cheese for easy mixing and a smooth texture; cold cream cheese makes mixing harder.
6. How do I prepare the coating nuts?
Toast the nuts until fragrant and golden, about 3 minutes, to bring out their flavor and crunch.
7. What if my cheese mixture is too sticky to shape?
If the mixture feels too sticky, refrigerate it for 10-15 minutes before shaping to make it more manageable.
8. Can I swap out the cheese types?
You can substitute shredded cheese with other types like Monterey Jack or Parmesan depending on your flavor preference.
9. When is the best time to serve the cheese ball?
Serve the cheese ball at room temperature to enjoy its full creaminess and flavor profile.
10. How should I store leftovers?
Store leftovers wrapped tightly in the fridge for up to 3 days; let it sit at room temp for 15 minutes before serving.
Making this cheese ball brings back so many memories of family gatherings and simple joys. It’s a dish that’s forgiving, adaptable, and always a hit when I want something comforting yet impressive. Honestly, I keep coming back to it because of how it balances richness with a touch of crunch, making every bite a little celebration. When you’re craving something savory and nostalgic, this recipe is the kind of thing that just works. It’s not fancy, but it feels like a small, satisfying act of love in the kitchen. Sometimes, that’s all you need.
And in the end, it’s these little homemade touches—like toasting nuts or tweaking herbs—that turn a basic appetizer into a personal tradition. No matter how many times I’ve made it, I still get a little thrill when guests gather around, eager to dig in. Sometimes, it’s the simplest recipes that leave the biggest impression, especially when they’re made with care and a little bit of improvisation.

Hi, I’m Hannah Reynolds, the heart behind Seasoning Therapist. I believe food can comfort, restore, and gently reset us after a long day. I started Seasoning Therapist with one simple idea in mind: cooking is not just about feeding the body, it is about caring for the mind too. The right seasoning can change the mood of a dish, and sometimes even the mood of the person eating it. This blog is where I combine my love for thoughtful cooking with my belief that the kitchen can be a place of healing.
