Focusing on how pan-frying paneer cubes can transform their texture from soft to satisfyingly crispy, making every bite a delightful contrast of chew and crunch. It’s a technique I often fall back on when I want to elevate a simple snack or add a crispy element to a veggie bowl. The sizzle and the smell of toasted edges are honestly addictive, and it’s so straightforward to pull off.
There’s something about that initial crackle of hot oil meeting cold, firm paneer that makes me smile. I love how this method turns a humble block of cheese into something that feels special—crisp on the outside, tender inside. It’s a small moment of joy, really, the kind that makes everyday cooking feel a little more rewarding.
This recipe is about more than just crunch; it’s about unlocking a different side of paneer I don’t always get to enjoy. It’s perfect for quick snacks, salads, or even as a party appetizer. Once you get the hang of that crispy exterior, you’ll find yourself reaching for paneer cubes more often, just to get that satisfying bite.
Focusing on how pan-frying paneer cubes can transform their texture from soft to satisfyingly crispy, making every bite a delightful contrast of chew and crunch.
The story behind this recipe
This recipe came together on a busy weekend when I needed something quick yet satisfying. I was tired of the usual fried paneer and wanted a method that brought out more flavor and texture. One evening, I just tossed cubes in a hot pan with a splash of oil, and that satisfying crackle amidst the smoky aroma became an instant keeper. Now, I find myself craving that crispy bite, especially when I want a snack that feels indulgent but is still straightforward to make.
Key Ingredients for Crispy Paneer
- Paneer: I prefer firm, fresh paneer with a slightly spongy texture, which crisps up beautifully. If yours is too soft, it might not hold up well when frying—try pressing out excess moisture first.
- Oil: I use a neutral oil with a high smoke point, like vegetable or canola oil, to get that perfect crisp without burning. A splash of sesame oil adds a subtle nutty aroma—go for it if you want an extra layer.
- Cornflour: I toss my paneer cubes in cornstarch to create that irresistible crunchy crust. For a lighter touch, you can use arrowroot, but don’t skip this step entirely—crispness is key.
- Spices: A pinch of turmeric and chili powder adds color and heat. I love a smoky paprika for depth—adjust the spice level to your taste, but don’t shy away from a little kick.
- Salt: I season my paneer before frying to enhance flavor. A quick sprinkle helps the spices stick and boosts overall taste—don’t forget to taste and adjust after cooking.
- Lemon juice: A squeeze right after frying brightens the flavor and cuts through the richness. Use fresh lemon for that zing—skip it if you prefer a milder profile.
- Optional herbs: Fresh cilantro or mint can add a fresh, vibrant note at the end. I toss them on just before serving—don’t add too early, or they’ll wilt.
Spotlight on key ingredients
Paneer:
- I prefer firm, fresh paneer with a slightly spongy texture, which crisps up beautifully. If yours is too soft, it might not hold up well when frying—try pressing out excess moisture first.
- Oil: I use a neutral oil with a high smoke point, like vegetable or canola oil, to get that perfect crisp without burning. A splash of sesame oil adds a subtle nutty aroma—go for it if you want an extra layer.
- Cornflour: I toss my paneer cubes in cornstarch to create that irresistible crunchy crust. For a lighter touch, you can use arrowroot, but don’t skip this step entirely—crispness is key.
Spices and herbs:
- Spices: Turmeric and chili powder add color and heat. A smoky paprika lends depth—adjust spice level to your taste, but don’t shy away from a little kick.
- Lemon juice: A squeeze right after frying brightens the flavor and cuts through the richness. Use fresh lemon for that zing—skip if you prefer a milder profile.
- Herbs: Fresh cilantro or mint add a vibrant note at the end. Toss them on just before serving—don’t add too early, or they’ll wilt.
Notes for ingredient swaps
- Dairy-Free: Coconut milk powder can replace paneer for a similar richness, but expect a slightly different mouthfeel and flavor.
- Oil: Avocado or light olive oil can be used instead of vegetable oil; they add subtle flavor and handle high heat well.
- Cornflour: Tapioca starch offers a crisp exterior too, but it may create a slightly chewier crust compared to cornstarch.
- Spices: Smoked paprika can substitute regular paprika for deeper smoky notes—great for a richer flavor profile.
- Lemon juice: Lime juice works as a bright alternative, giving a slightly different citrus zing and aroma.
- Herbs: Fresh basil or chives can be tossed on at the end for different fresh herbal accents, though they won’t have the same bright note as cilantro or mint.
- Salt: Sea salt flakes provide a crunch and a more complex saltiness compared to regular table salt, if you like a bit of texture.
Equipment & Tools
- Non-stick skillet or cast iron pan: Provides even heat for crispy frying.
- Spatula: Turns and removes paneer cubes safely.
- Small bowl: For tossing paneer with cornstarch.
- Paper towels: Drains excess oil for crispiness.
Step-by-step guide to pan-frying
- Equipment & Tools: Gather a non-stick skillet or cast iron pan, a spatula, a small bowl for coating, and paper towels for draining.
- Prepare paneer: Cut a block of paneer into 1-inch cubes. Pat them dry with paper towels to remove excess moisture.
- Coat cubes: In a small bowl, toss paneer cubes with a tablespoon of cornstarch, ensuring all sides are lightly coated.
- Heat oil: Pour vegetable or canola oil into your pan, about 1/4 inch deep. Heat over medium-high heat until shimmering (~180°C / 350°F).
- Cook cubes: Carefully add paneer to hot oil. Fry for 2-3 minutes, turning occasionally, until golden brown and crispy on all sides.
- Check for doneness: The cubes should be crisp, golden, and have a slight crackle when pressed. If not, cook a bit longer.
- Drain & rest: Remove paneer cubes with a slotted spoon. Place on paper towels to drain excess oil. Let rest for 1 minute.
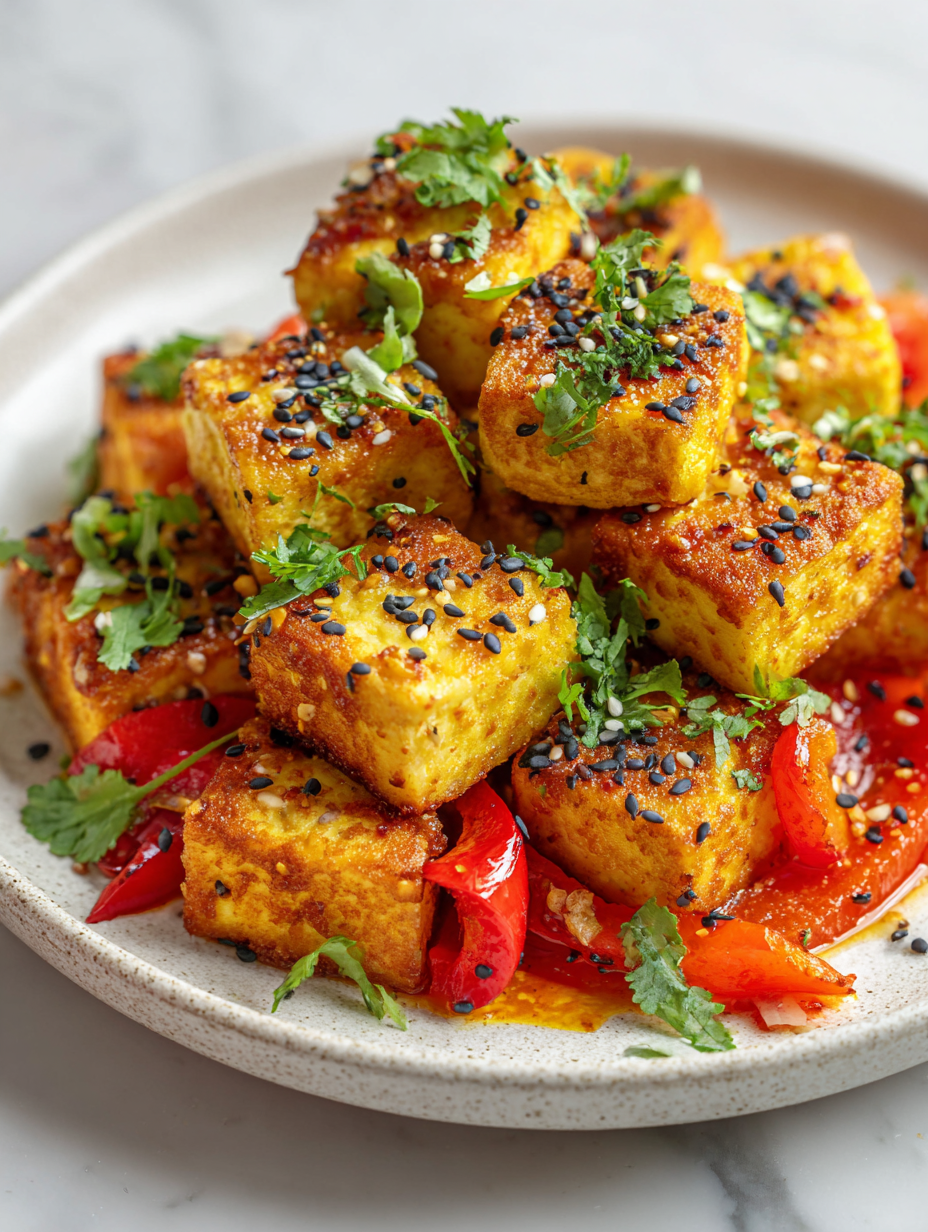
- Finish & plate: Squeeze fresh lemon over the crispy paneer. Garnish with chopped herbs if desired. Serve immediately for best crunch.
Let the fried paneer rest briefly on paper towels, then squeeze lemon and garnish with herbs. Serve hot for maximum crunch and flavor.
How to Know It’s Done
- Crisp, golden exterior with a slight crackle when pressed.
- Paneer feels firm yet tender inside when tested with a fork.
- Oil temperature maintained around 180°C / 350°F for even crispiness.
Crispy Pan-Fried Paneer Cubes
Ingredients
Equipment
Method
- Cut the paneer into 1-inch cubes and pat them dry thoroughly with paper towels to remove excess moisture. This helps achieve maximum crispiness during frying.
- In a small bowl, toss the paneer cubes with cornstarch, turmeric, chili powder, and a pinch of salt, ensuring all sides are lightly coated. This coating creates the crispy exterior.
- Heat about 1/4 inch of oil in a non-stick or cast iron skillet over medium-high heat until shimmering and hot, around 180°C (350°F). You can test the temperature by dropping in a small piece of paneer; it should bubble immediately.
- Carefully add the coated paneer cubes to the hot oil, placing them in a single layer without overcrowding. Fry for about 2-3 minutes, turning occasionally with a spatula, until they turn golden brown and develop a crispy crust with a crackling sound.
- Once crispy and golden, use a slotted spoon to transfer the paneer to paper towels to drain excess oil. Rest for about a minute to allow the crust to set.
- Squeeze fresh lemon juice over the hot crispy paneer to brighten the flavors, then sprinkle with chopped herbs for a fresh touch.
- Serve immediately to enjoy the contrasting textures of crunchy exterior and tender interior. These crispy paneer cubes make an excellent snack, salad topping, or appetizer.
Notes
Pro tips for crispy paneer
- Dry paneer thoroughly: Moisture causes splatters and prevents crisping—pat with paper towels until no dampness remains.
- Fry in small batches: Overcrowding drops oil temperature, leading to sogginess—fry enough to keep oil hot and crisp up evenly.
- Maintain oil temperature: Keep around 180°C / 350°F—use a thermometer or test with a small piece for crackling and golden color.
- Turn frequently: Flip every 30 seconds to ensure even browning—prevent uneven patches and overcooking.
- Use a light coating: Toss in cornstarch just before frying—too thick and it can become doughy, too little and you miss crunch.
- Add lemon after frying: Brightens flavor and cuts through oiliness—squeeze fresh lemon just before serving for best zing.
- Adjust heat carefully: If oil smokes or burns, lower heat immediately—burnt oil imparts bitter flavors and ruins crispiness.
Common mistakes and how to fix them
- FORGOT to dry paneer before coating → Moisture causes splatters and soggy crust.
- DUMPED too many cubes at once → Fry in batches for even crispiness and avoid overcrowding.
- OVER-TORCHED oil → Keep heat moderate; burnt oil imparts bitter flavor, lower heat if smoking occurs.
- MISSED flipping regularly → Turn paneer every 30 seconds for even browning and crunch.
Quick fixes and pantry swaps
- If oil splatters, splash a little water away from flame and lower heat slightly.
- When paneer isn’t crispy enough, rescue with a quick blast under the broiler for a minute.
- Splash some lemon juice on the cubes if they turn out too bland or oily.
- Patch over overcooked or burnt spots with fresh, crispy paneer pieces for presentation.
- Shield soggy paneer with a quick re-fry in hot oil for an extra crunch and fresh flavor.
Prep, store, and reheat tips
- Prepare paneer cubes: Cut and pat dry the paneer a few hours ahead to save time and prevent excess moisture during frying.
- Store leftovers: Keep cooked paneer in an airtight container in the fridge for up to 3 days, with a slight change in texture and flavor over time.
- Reheat with care: Warm in a hot skillet for a few minutes until crispy again, or briefly microwave until heated through, but expect some loss of crunch.
- Sensory note: The aroma will fade slightly, and the exterior may lose some crispness, so reheat until you hear a gentle crackle again to revive the texture.
Top questions about paneer cubes
1. Why fry paneer instead of just sautéing or grilling?
Pan-frying gives paneer a crispy exterior while keeping the inside soft and tender—think of that satisfying crackle with each bite.
2. Can I use pre-packaged or frozen paneer?
Using firm, fresh paneer helps achieve that golden, crispy crust without falling apart. Press out excess moisture for best results.
3. What oil should I use for frying paneer?
A neutral, high smoke point oil like vegetable or canola is best. It heats evenly and crisps the paneer without imparting strong flavors.
4. Is coating the paneer necessary?
Tossing the cubes in cornstarch or arrowroot creates that irresistible crunch. Don’t skip this step if you want crispy edges.
5. How do I know when the oil is hot enough?
Cooking at about 180°C (350°F) ensures a golden, crispy exterior. Use a thermometer or test with a small piece for crackling and color.
6. Can I fry all the cubes at once?
Overcrowding drops the oil temperature, resulting in soggy paneer. Fry in small batches for even crispiness and consistent texture.
7. Should I rest the paneer after frying?
After frying, drain the paneer on paper towels to remove excess oil. Rest for a minute before serving to keep that crunch intact.
8. When should I add lemon juice?
Adding a squeeze of fresh lemon brightens the flavor and cuts through the richness, making each bite lively and fresh.
9. Can I add herbs before frying?
Stir in fresh herbs like cilantro or mint just before serving to preserve their vibrant flavor and aroma.
10. How should I store and reheat fried paneer?
Store leftovers in an airtight container in the fridge for up to 3 days. Reheat in a hot pan to regain crispness, listening for that crackle.
Frying paneer cubes transforms them into a satisfying, crispy snack that’s hard to resist. The contrast between the crunchy exterior and tender inside makes every bite a little more special. It’s a simple technique that elevates something humble into a real treat.
Whenever I make these, I’m reminded how small tweaks — like a splash of lemon or a quick toss in cornstarch — can turn everyday ingredients into something memorable. They’re perfect for a quick snack or a lively addition to a salad or curry.

Hi, I’m Hannah Reynolds, the heart behind Seasoning Therapist. I believe food can comfort, restore, and gently reset us after a long day. I started Seasoning Therapist with one simple idea in mind: cooking is not just about feeding the body, it is about caring for the mind too. The right seasoning can change the mood of a dish, and sometimes even the mood of the person eating it. This blog is where I combine my love for thoughtful cooking with my belief that the kitchen can be a place of healing.
