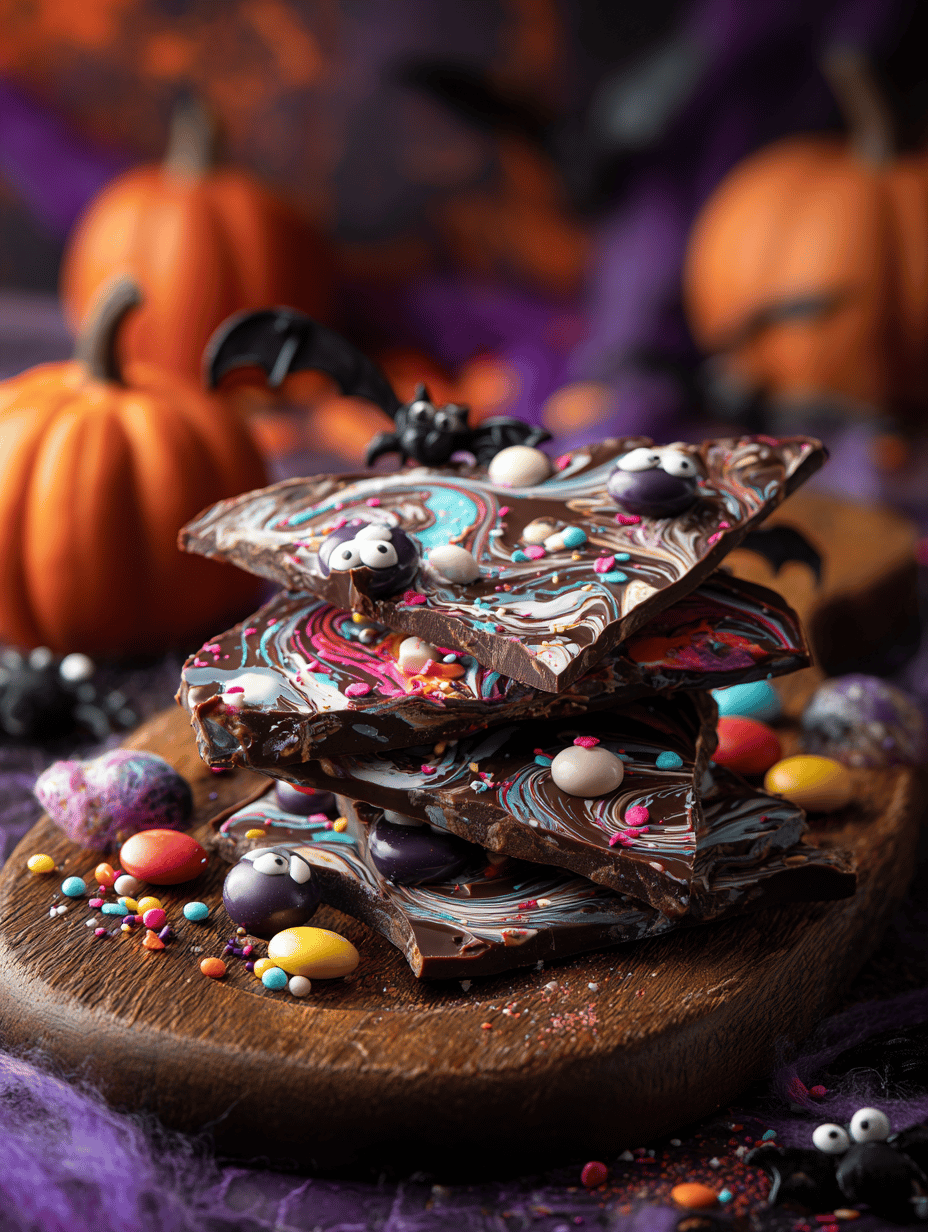
Halloween is all about the unexpected, the playful, and the slightly spooky. Making your own bark turns candy into a canvas for chaos—think bright colors, weird shapes, and crunchy surprises. It’s a messy joy that fits right into the season’s spirit of wild creativity.
Why I keep making this spooky treat
It’s quick, forgiving, and endlessly customizable. Plus, smashing it apart to reveal colorful shards is oddly satisfying. Every batch feels like a creative mess that everyone loves, especially when you add that extra sprinkle or unexpected topping. It’s a chaos that makes Halloween feel alive.
Ingredients and their quirks
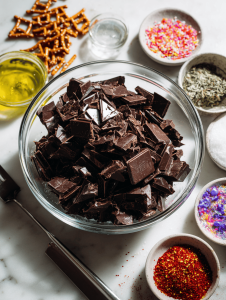
- Dark chocolate or melting wafers: Rich, smooth, and melts beautifully. Swap with white chocolate or vegan options if you prefer.
- Toppings—candy, pretzels, sprinkles: Add crunch and color. Use what you love; candy corns, nuts, or dried fruit work well.
- Edible glitter or sprinkles: For a festive shimmer. Go for non-toxic, kid-friendly options.
- Sea salt or chili flakes: A pinch enhances sweetness or adds heat. Use sparingly to keep balance.
- Food coloring gels: Brighten your chocolate with vivid hues. Liquid dyes can thin the chocolate, so gel is better.
Tools of the trade for Halloween bark
- Heatproof bowl: Melts your chocolate evenly without burning.
- Spatula: Spreads the melted chocolate smoothly across the baking sheet.
- Baking sheet lined with parchment: Provides a sturdy surface for setting and breaking the bark.
- Knife or hands for breaking: Creates jagged, natural-looking pieces.
Step-by-step to spooky, crunchy, homemade Halloween bark
Step 1: Line a baking sheet with parchment paper.
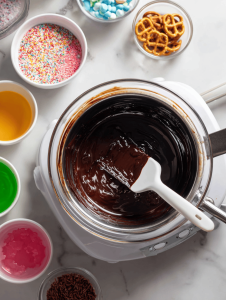
Step 2: Melt your chocolate in a heatproof bowl over simmering water or microwave in 30-second bursts, stirring each time.
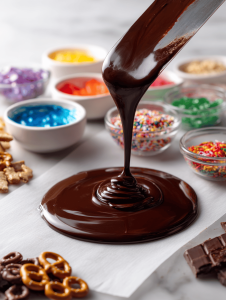
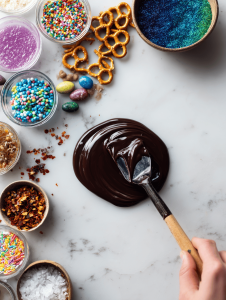
Step 3: Pour the melted chocolate onto the prepared sheet, spreading it into an even layer with a spatula.
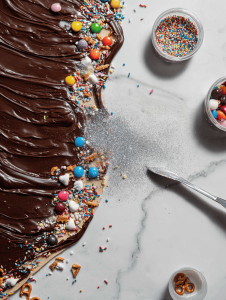
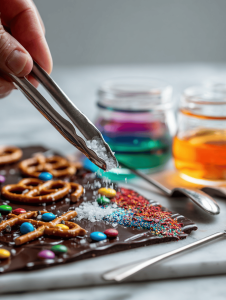
Step 4: While still warm, sprinkle your chosen toppings—think crushed candy, pretzels, or edible glitter—over the surface.
Step 5: Let the bark cool at room temperature for about an hour, or chill in the fridge for 30 minutes until set.
Step 6: Once firm, break into jagged pieces with your hands or a knife.
Step 7: Enjoy immediately, or store in an airtight container for up to a week.
Cooking checkpoints and tips for perfect Halloween bark
- Chocolate should be smooth and glossy, not lumpy or grainy, which means it’s properly melted.
- Toppings need to be pressed lightly into the chocolate so they stick, but not so much that they sink.
- The surface should be shiny and crack when you gently bend a corner, indicating it’s fully set.
- If the chocolate cracks unevenly, let it sit at room temp longer before breaking.
- Keep an eye on the fridge; don’t chill too long or it can become too hard to break cleanly.
Common pitfalls and how to fix them
- Chocolate seized or lumpy.? Ensure chocolate is fully melted, not grainy. If grainy, gently re-melt and stir.
- Toppings sliding off before setting.? Sprinkle toppings lightly and press gently. If toppings fall off, press more firmly.
- Chocolate remains sticky or soft.? Don’t rush the cooling. If it’s sticky, chill longer or let sit at room temp.
- Dull or mottled appearance.? Avoid over-chilling; room temp helps develop a shiny, crackly surface.
Halloween Chocolate Bark
Ingredients
Equipment
Method
- Line a baking sheet with parchment paper to prepare for melting and setting the chocolate.

- Chop or break the chocolate into smaller pieces and place them in a heatproof bowl.
- Melt the chocolate gently in the microwave in 30-second bursts, stirring well each time until smooth and glossy. Alternatively, melt over a double boiler until fully melted and shiny.
- Pour the melted chocolate onto the prepared parchment, spreading it evenly with a spatula into a thin, smooth layer.
- While the chocolate is still warm, sprinkle your chosen toppings—candy pieces, pretzels, sprinkles—gently pressing them into the surface to ensure they stick.

- Sprinkle a light dusting of edible glitter or sprinkles over the surface for a shimmering, festive effect.
- If desired, add a pinch of sea salt or chili flakes for an extra flavor kick.
- Let the bark cool at room temperature for about an hour or chill in the fridge for 30 minutes until fully set and firm to the touch.
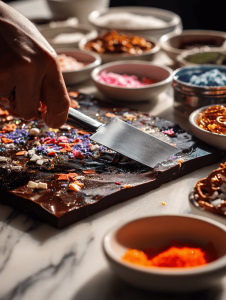
- Once set, break the hardened chocolate into jagged shards using your hands or a knife, creating an irregular, spooky appearance.
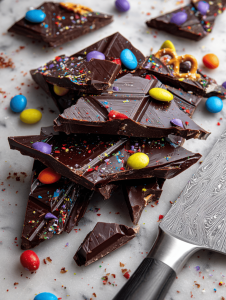
- Enjoy immediately or store in an airtight container at room temperature for up to a week, ensuring it stays crisp and colorful.
Notes

Hi, I’m Hannah Reynolds, the heart behind Seasoning Therapist. I believe food can comfort, restore, and gently reset us after a long day. I started Seasoning Therapist with one simple idea in mind: cooking is not just about feeding the body, it is about caring for the mind too. The right seasoning can change the mood of a dish, and sometimes even the mood of the person eating it. This blog is where I combine my love for thoughtful cooking with my belief that the kitchen can be a place of healing.
