A protein snack plate might sound straightforward, but there’s a real art to assembling one that’s both satisfying and vibrant. It’s about more than just tossing some meats and cheeses on a platter; it’s about balancing textures, colors, and flavors in a way that invites you to pick and nibble for hours.
I’ve found that the magic happens when I think of a snack plate as a tiny, edible mosaic. It’s kind of meditative, especially on busy days or when I want something quick but still crave a bit of comfort and variety. Plus, it’s endlessly adaptable—whatever you love, you can build around that.
Focusing on the overlooked art of assembling a protein snack plate that balances not just flavors but also textures and colors, turning a simple snack into a visually appealing, satisfying mini-meal perfect for busy days or casual get-togethers.
The story behind this recipe
- This recipe came together on a hectic weekend when I needed something quick, nourishing, and visually appealing. I was tired of the usual snack options and wanted to create something that felt like a tiny, balanced meal. The idea was to combine textures and flavors that kept me interested with every bite.
- I remember assembling this plate late at night, trying to use what I had in the fridge. It turned out to be a surprisingly satisfying mix—crunchy nuts, smoky meats, fresh veggies—and it made me realize how much I enjoy the art of thoughtful snacking. It’s become my go-to for easy, wholesome bites when time’s tight.
- heading: The story behind this recipe
Ingredient breakdown
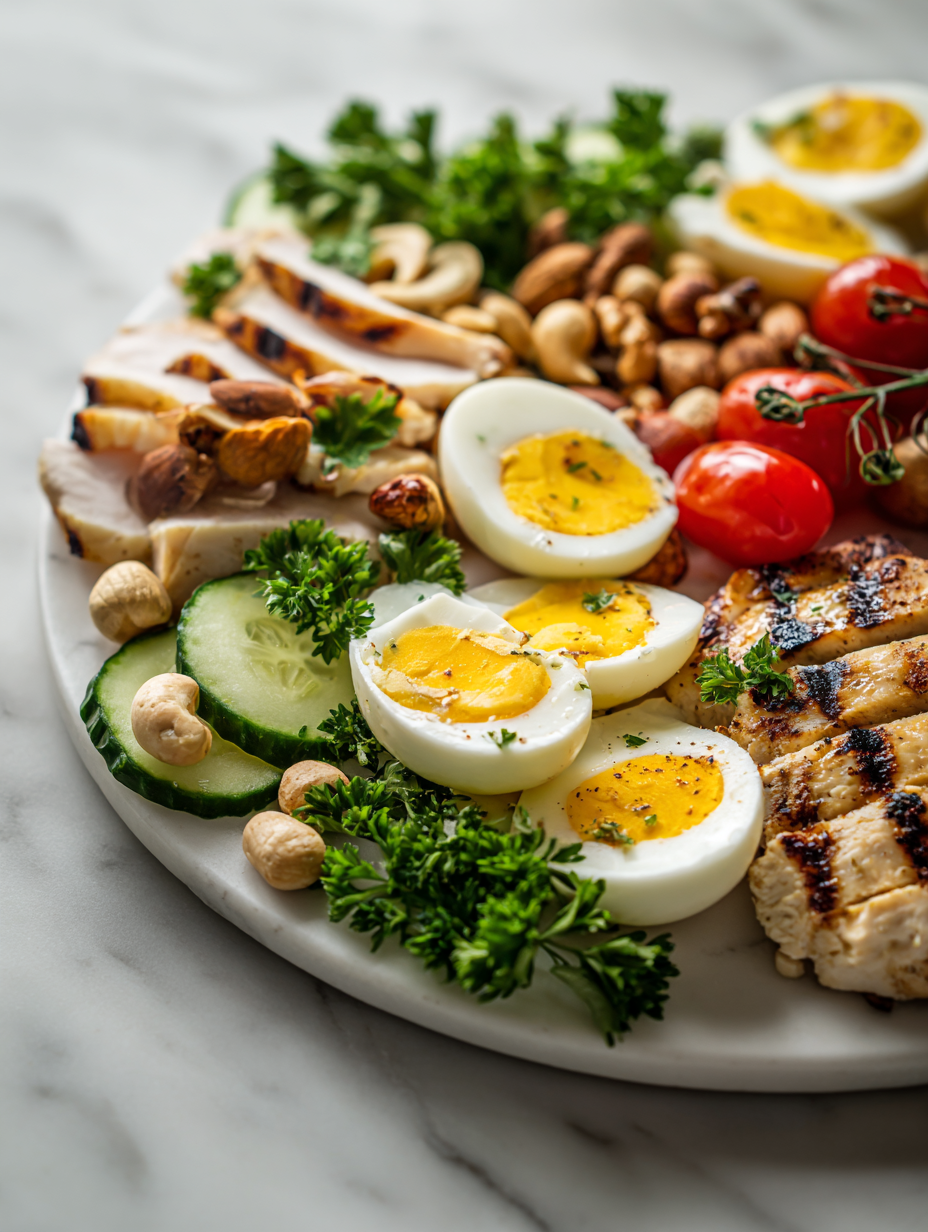
- Cheddar cheese: I love how a sharp, creamy cheddar melts just enough to be gooey but still holds its tang. Swap for gouda if you want a milder, nuttier bite.
- Sliced turkey breast: It’s my go-to for a lean, mild flavor that’s soft and satisfying. For a smoky twist, try smoked chicken instead.
- Mixed nuts: Crunchy, oily, and rich—these nuts add a great textural contrast. If you’re allergic, crispy chickpeas give a similar snap.
- Cherry tomatoes: They’re juicy and burst with a sweet-sour zing that refreshes the palate. Roast ’em lightly for a smoky depth, or leave raw for brightness.
- Hummus: I prefer a smooth, garlicky hummus that’s velvety with a hint of lemon. You can swap in tzatziki for a herby, tangy alternative.
- Cucumber slices: Cool, crisp, and hydrating—these slices bring a fresh crunch. Try pickling them briefly for a tangy twist.
- Olives: Salty, briny, and a little oily—these olives punch up the flavor. Kalamata or castelvetrano work well, but skip if you prefer milder tastes.
Spotlight on key ingredients
Cheddar cheese:
- I love how a sharp, creamy cheddar melts just enough to be gooey but still holds its tang. Swap for gouda if you want a milder, nuttier bite.
- Sliced turkey breast: It’s my go-to for a lean, mild flavor that’s soft and satisfying. For a smoky twist, try smoked chicken instead.
Mixed nuts & Cherry tomatoes:
- Mixed nuts: Crunchy, oily, and rich—these nuts add a great textural contrast. If you’re allergic, crispy chickpeas give a similar snap.
- Cherry tomatoes: They’re juicy and burst with a sweet-sour zing that refreshes the palate. Roast ’em lightly for a smoky depth, or leave raw for brightness.
Notes for ingredient swaps
- Cheese: I love a sharp cheddar for its tang and meltiness, but swap in gouda for a milder, nuttier flavor.
- Deli meats: Sliced turkey breast is lean and mild; for more smoky notes, try smoked chicken or ham.
- Nuts: Crunchy mixed nuts add richness, but if allergic, crispy roasted chickpeas give a similar satisfying crunch.
- Tomatoes: Juicy cherry tomatoes brighten the plate; roast them lightly for smoky sweetness or keep raw for freshness.
- Hummus: I prefer classic garlic hummus with lemon brightness; swap with tzatziki for a herby, tangy twist.
- Veggies: Cucumber slices are crisp and cool; for a tangy kick, briefly pickle them before serving.
- Olives: Briny, oily olives like Kalamata punch up the flavor; choose milder castelvetrano if you prefer subtler notes.
Equipment & Tools
- Large platter: To hold all the components and create a visually appealing arrangement.
- Small bowls: For dips, spreads, or small items like olives and nuts.
- Sharp knife: For slicing cheese, meats, and vegetables cleanly.
- Cutting board: Surface for prepping ingredients.
- Dry skillet: To toast nuts for added flavor and crunch.
Step-by-step guide to assembling
- Gather all ingredients and tools: a large platter, small bowls, a sharp knife, and a cutting board.
- Slice the cheese into bite-sized cubes or thin slices, about 1 cm thick. Arrange in a corner of the platter.
- Lay out the deli meats: rolled or folded slices, making colorful stacks for visual appeal.
- Wash and prep vegetables: cucumber slices, cherry tomatoes, and any other add-ons. Arrange them in small piles or sections.
- Toast nuts lightly in a dry skillet over medium heat (about 3-4 minutes), until fragrant and slightly golden. Let cool.
- Scoop hummus into a small bowl. Drizzle with a little olive oil and sprinkle with paprika or chopped herbs if desired.
- Arrange nuts, olives, and vegetables in small clusters around the cheeses and meats, balancing colors and textures.
- Add any extras like hard-boiled eggs, fresh herbs, or pickles for variety and brightness.
- Finish with a garnish of fresh herbs or edible flowers if available. Drizzle a bit of honey or balsamic glaze over some elements for extra flavor.
Let the assembled plate sit for 5 minutes before serving, allowing flavors to meld. Garnish with fresh herbs or microgreens. Serve at room temperature for best texture and aroma.
How to Know It’s Done
- Cheese edges should be firm but not crumbly, with a pleasant aroma.
- Meats should be tender but hold their shape, with no excess oil or moisture.
- Vegetables should be vibrant, crisp, and fresh, not wilted or soggy.
Protein Snack Plate
Ingredients
Equipment
Method
- Arrange the cheese slices or cubes in one corner of the large platter, creating a neat and inviting section.
- Layer the sliced turkey breast in folded stacks nearby, adding pops of color and variety to the arrangement.
- Lightly toast the mixed nuts in a dry skillet over medium heat until fragrant and golden, then transfer to a small bowl to cool slightly.
- Place the cherry tomatoes in a small bowl or arrange them in clusters around the cheeses and meats for a burst of juiciness and color.
- Scoop the hummus into a small bowl, drizzle with a little olive oil, and sprinkle with herbs or paprika for extra flavor and visual appeal.
- Arrange the sliced cucumber evenly around the platter, adding a crisp, cool element to the display.
- Scatter the toasted nuts and olives in small clusters across the platter, balancing textures and colors for visual interest.
- Garnish with fresh herbs or edible flowers if available, and give the entire platter a gentle shake to settle everything into place.
Pro tips for assembling
- Use fresh nuts and toast them just until fragrant—avoid burning, which turns flavor bitter.
- When arranging ingredients, place contrasting colors next to each other for visual pop.
- Gently jiggle the platter after assembling to settle ingredients and prevent shifting.
- For even slices, chill cheese slightly before slicing; it firms up and reduces crumbling.
- Drizzle olive oil over vegetables just before serving for a shiny, appetizing look.
- Keep delicate items like cherry tomatoes and herbs at room temperature for maximum flavor release.
Common mistakes and how to fix them
- FORGOT to check ingredient freshness → Use fresh, vibrant ingredients for best flavor.
- DUMPED ingredients in pan → Distribute ingredients evenly for consistent cooking.
- OVER-TORCHED nuts → Toast until fragrant, not darker than light golden.
- MISSED resting time → Let the plate sit 5 minutes before serving to meld flavors.
Quick fixes and pantry swaps
- When ingredients seem dull, splash a squeeze of lemon to brighten the flavors.
- If nuts are burnt, immediately dump them into a bowl and start toasting fresh ones.
- When cheese is too soft, patch with a quick chill in the freezer before slicing.
- Splash a little olive oil if the plate looks sparse or dry to add shimmer.
- When in doubt, swap dried fruits or crunchy seeds from pantry for added texture and color.
Prep, store, and reheat tips
- Prep ingredients like cheeses, meats, and veggies ahead of time; store in airtight containers in the fridge for up to 24 hours, keeping everything crisp and fresh with minimal flavor loss.
- Assemble the plate partially in advance—place cheeses, meats, and nuts on the platter a few hours before serving. Cover loosely and refrigerate; bring to room temperature 15 minutes prior to serving for optimal flavor.
- Dressing or dips like hummus can be made a day ahead. Keep chilled and covered; the flavors meld and intensify overnight, adding a creamy, lemon-bright note just before plating.
- Refrigerate leftovers in airtight containers for up to 2 days. For best sensory experience, serve at room temperature, and give the plate a gentle rearrangement if needed. The nuts and cheeses may soften slightly, but the flavors remain inviting.
Top questions about protein snack plates
1. How do I choose the best cheese for a snack plate?
Look for firm, fresh cheeses with a pleasant aroma. They should feel slightly pliable but not sticky or crumbly.
2. Can I use roasted nuts instead of raw ones?
Yes, roasted nuts develop a richer flavor and crunch. Toast them in a dry skillet over medium heat until fragrant, about 3–4 minutes.
3. How do I pick the best vegetables for the plate?
Fresh veggies like cucumbers and cherry tomatoes should be crisp, vibrant, and free of wilting or soft spots.
4. What’s the best way to prepare deli meats?
Use cold, high-quality deli meats. Roll or fold slices to keep them neat and colorful without squeezing out excess oil.
5. How can I tell if my hummus is fresh and good?
A good hummus should be smooth, velvety, with a garlicky, lemony brightness. If it’s too thick, stir in a splash of olive oil or water.
6. Which olives are best for a snack plate?
Olives should be plump, shiny, and slightly oily. Kalamata or castelvetrano are great options—skip if you dislike salty, briny flavors.
7. How do I spot fresh ingredients at the store?
Avoid ingredients that look dull, wilted, or have off smells. Always check for bright color, firmness, and freshness.
8. Any tips for aesthetically pleasing plating?
Arrange components with contrasting colors and textures for visual appeal. Place the crunchier items near softer ones for balance.
9. What quick fixes can elevate a dull snack plate?
If ingredients seem dry or dull, a light drizzle of olive oil or a squeeze of lemon can revive their flavor and appearance.
10. How far in advance can I prepare ingredients?
Store prepped ingredients in airtight containers in the fridge for up to 24 hours. Bring to room temp before serving for maximum flavor.
Building a protein snack plate is more than just stacking ingredients; it’s about creating a balanced, inviting bite every time. When I assemble mine, I think about contrast—crisp with creamy, salty with fresh—and it makes the process feel almost meditative.
In a world rushing toward quick fixes, taking a moment to thoughtfully arrange and savor each element reminds me that good food is about connection—whether with flavors, textures, or the people sharing it. Sometimes, the simplest snacks turn into the most satisfying little rituals.

Hi, I’m Hannah Reynolds, the heart behind Seasoning Therapist. I believe food can comfort, restore, and gently reset us after a long day. I started Seasoning Therapist with one simple idea in mind: cooking is not just about feeding the body, it is about caring for the mind too. The right seasoning can change the mood of a dish, and sometimes even the mood of the person eating it. This blog is where I combine my love for thoughtful cooking with my belief that the kitchen can be a place of healing.
